
A simple yet profitable strategy and a plan is the ultimate key to consistent long-term profitability because it allows traders to capitalize on their edge without emotions day in and day out. Today’s post is presenting you with a profitable and solid trading swing strategy on the 4-hour chart. So it is vital to follow along carefully and make sure that all the steps are understood.
Note: there is one important task we would like to ask you to complete in return for access to this profitable strategy. We want you to tweak and test it with your own ideas. That way we can perhaps build a better strategy with more profits or less volatility. Also, read How Currency Pairs Work in Forex.
If you are looking for a strategy which uses intraday tactics instead, make sure to read this article on the best trading strategies here.
Statistics of setup for this simple yet profitable strategy:
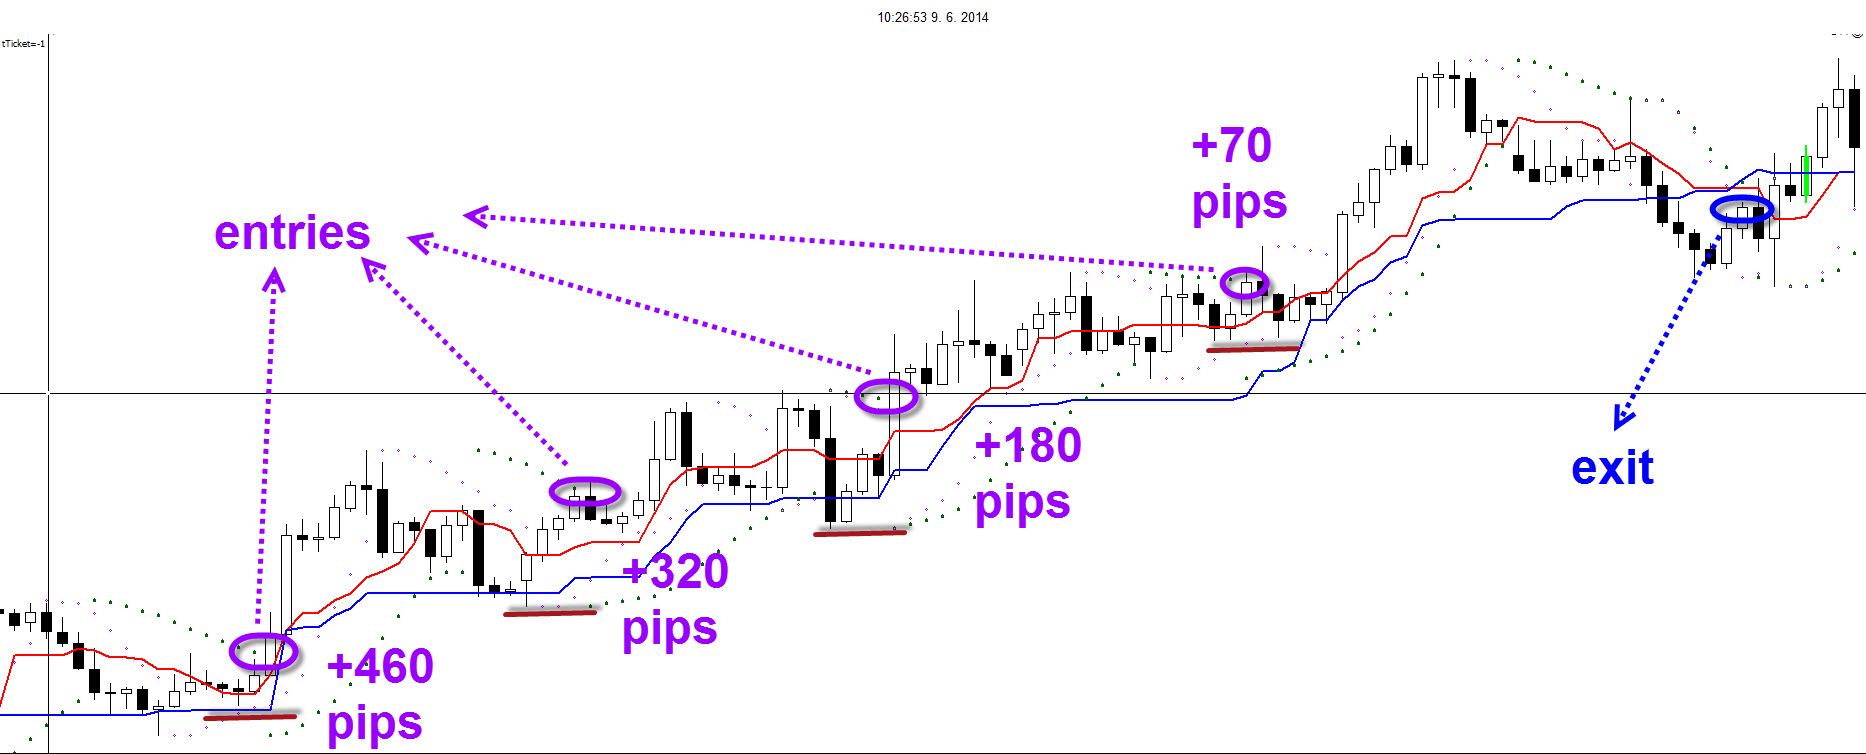
The first thing we want to share with you is the performance details of the strategy. We need to make sure that you are taking this setup seriously and are appreciating the value provided in this article. Therefore, let us review the stats of the EURAUD backtest in the entire 2013:
1) Trail stop Parabolic: +13.8 units of risk / +0.39 per trade.
2) Trail stop Tenkan: +43.9 units of risk / +1.25 per trade.
3) The average reward (half Parabolic and half via Tenkan) is +28.86 units of risk / +0.82 per trade.
4) That means if a trader is risking 1% per trade, the profit is +28.86%.
5) 35 trades taken.
I am sure we have your attention now. We advise paying close attention because the stats get even better… The remaining stats are calculated on the basis of scenario 3:
a) 17 wins and 18 losses for roughly 50% – 50%.
b) The average win was +3.2 and the average loss was -0.58.
c) The profit factor therefore was 3.2 / 0.58 = 5.55 (!).
d) There were 10 trades out of the 17 that made 1 unit of reward or more.
e) There were only 4 trades out of 18 that closed for a full loss.
When each unit of loss was compensated by 5.5 units of reward and approximately 50% of the trades are won, then obviously the strategy is going to pull into profit.
The strategy is uniquely able to capture long runs and big wins.
Not only does the performance show stellar stability, but there are other advantages as well:
1) Simplicity – simple rules that are not demanding to implement.
2) The strategy can really ride long on momentum.
Enough has been said on the performance details of this strategy, so it is time to move on and explain the rules and ideas behind this concept.
STRATEGY 201
Here are the basic details connected to the strategy:
Our goal was to create a swing strategy that can be actively traded by all types of traders from beginners to very experienced ones.
As always, our only focus is on technical analysis. The discretionary element is limited to ensure that our rules are crystal clear for all traders.
The main strength of our strategy will be to capitalize on trending breakouts. Therefore, the strategy is focused on trading with the trend but it will only use one-time frame: the 4-hour chart.
Our tools and indicators are simple:
a) Parabolic settings 2 = green dots.
b) Parabolic settings 5 = purple dots.
c) Ichimoku indicator: Tenkan-sen / Tenkan= red line.
d) Ichimoku indicator: Kijun-sen / Kijun = blue line’.
As a roadmap and building block for constructing any strategy, we highly recommend reading Forex Chart Patterns and How to Find Opportunity in Forex.
TOFTEM MODEL
This model is a checklist of the 5 steps prior to and during the entry.
T = Trend
O = Opportunity
F = Filters
T = Trigger
EM = Entry Method
All of these steps will be reviewed here one by one for this swing strategy. The 4-hour chart is used for all of the 5 steps, besides the filter chart which uses the daily time frame.
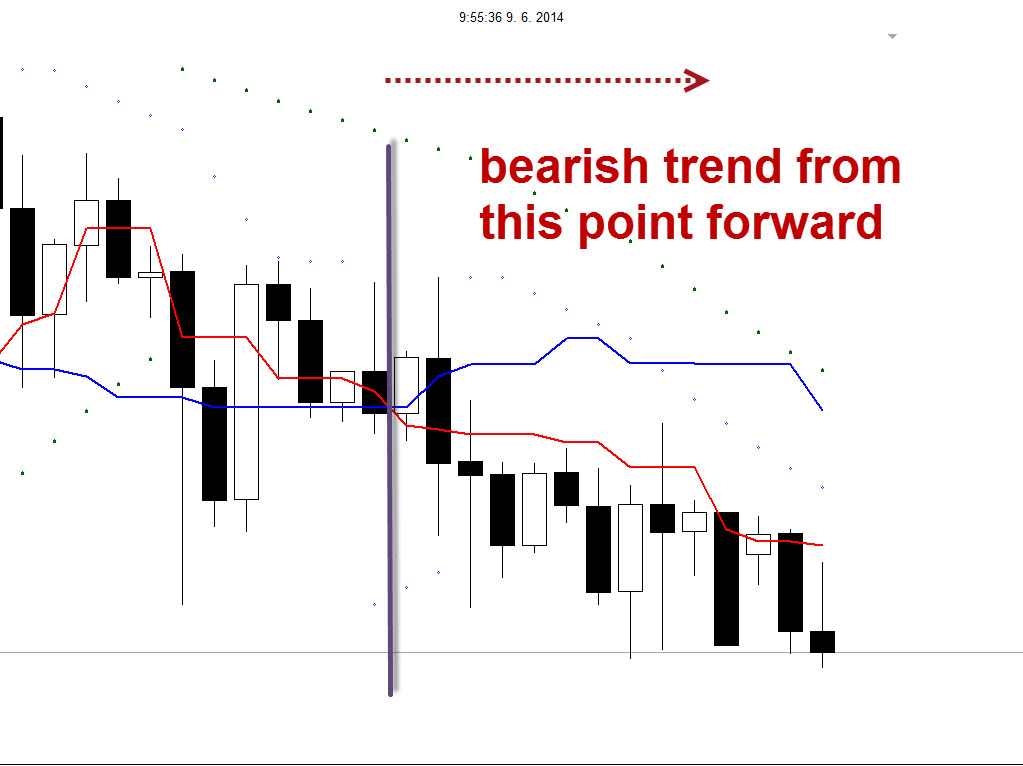
PART 1 DEFINING TREND
This strategy uses the Tenkan and the Kijun lines for trend definition purposes. The Tenkan and Kijun lines are part of the Ichimoku indicator, but the remaining 3 parts of the indicator were removed (please read more here about the Ichimoku indicator).
The strategy needs Tenkan and the Kijun to be aligned to one side:
a. When the Tenkan is above the Kijun – bullish bias.
b. When the Tenkan is below the Kijun – bearish bias.
c. When the Tenkan equals the Kijun -range.
This is a sweet, simple and effective way of measuring the trend. Trading must not be complicated or high level mathematical to be profitable.
PART 2 OPPORTUNITY
The opportunity is valid when the Tenkan has an angle:
a. An upward sloping angle means upward momentum.
b. A downward sloping angle means downward momentum.
c. A flat angle means no trend/range environment and no momentum.
The trend and opportunity have to be aligned to the same side before a trader can continue with the next step. This could be either:
A) Bullish trend and bullish opportunity.
B) OR bearish trend and bearish opportunity.
In the screenshot below is an example of when a currency has momentum to the upside, downside or no side (flat).
Again the opportunity is very intuitive and has an internal logic to it. Nothing fancy yet effective.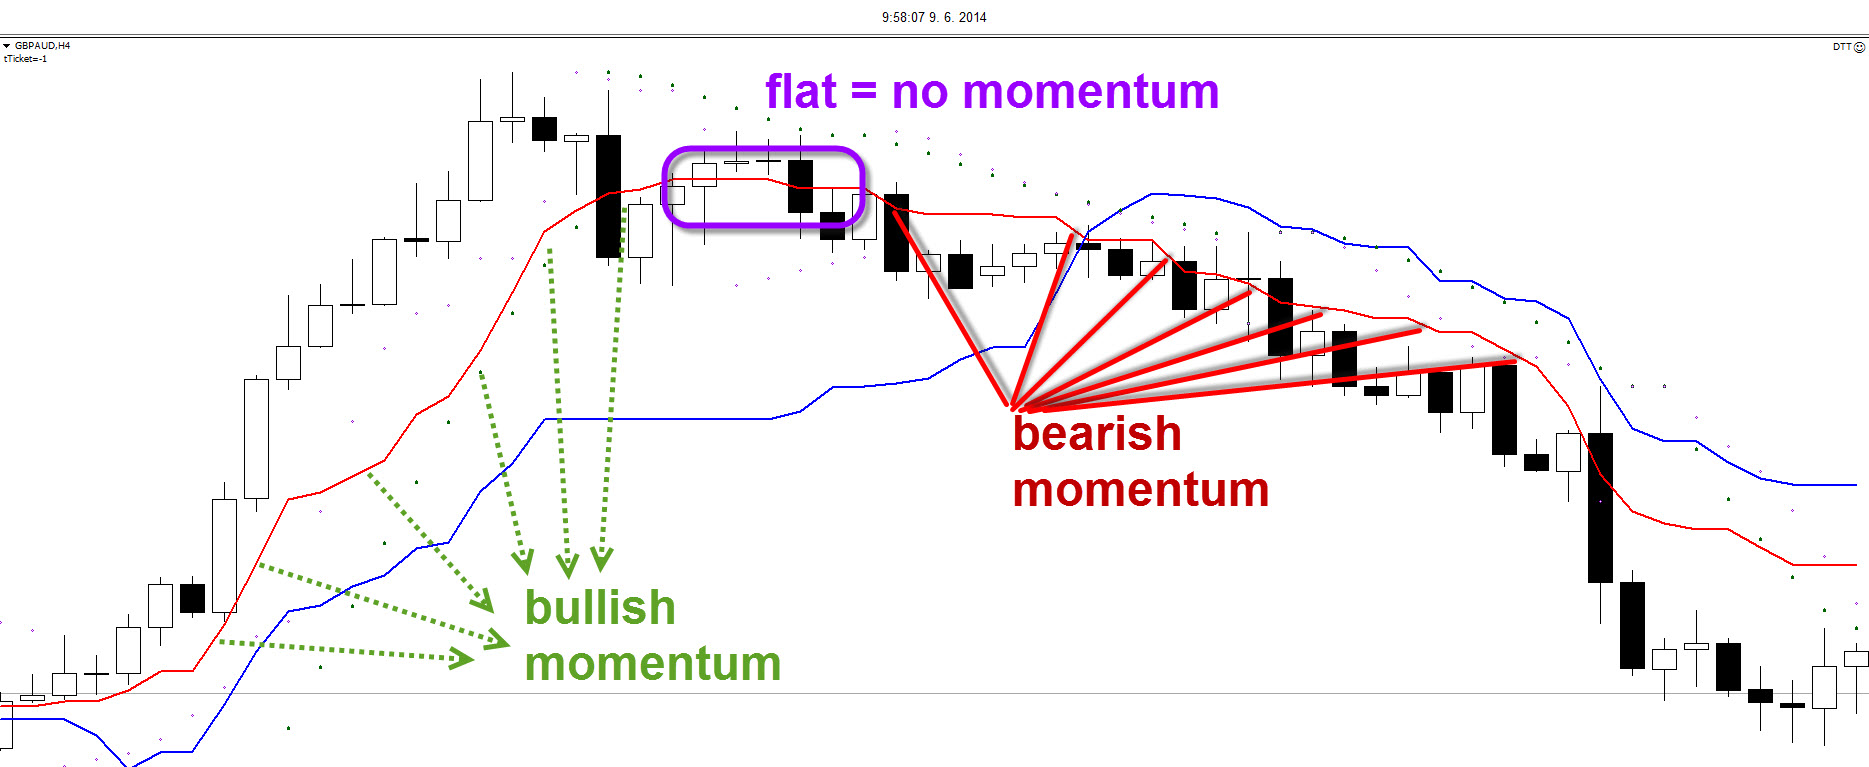
PART 3 FILTERS
The filter uses the daily chart to check if any trend and momentum face major obstacles such as daily tops and bottoms. If yes, and the price is too close (sufficient space towards S&R) then that pair and potential trade setup would be filtered out and ignored. When testing the strategy, no filters were used, which means that the statistics are showing the “gross” performance. The results can potentially be improved with filters.
The filter steps keep our focus on valid setups and make sure our mind is not overtrading. Filters are very important for making your trading more profitable.
PART 4 TRIGGER
The trigger is the moment that the trader is waiting for: the price has confirmed its expected development and a trader is one step away from entering. The trade is not just a potential trade setup but it close to becoming an actual trade. This strategy uses the following triggers:
1) For a bullish trend and bullish opportunity: price needs to break through one of the two Parabolic levels to the upside (parabolic is above price).
2) For a bearish trend and bearish opportunity: price needs to break through one of the two Parabolic levels to the downside (parabolic is below the price).
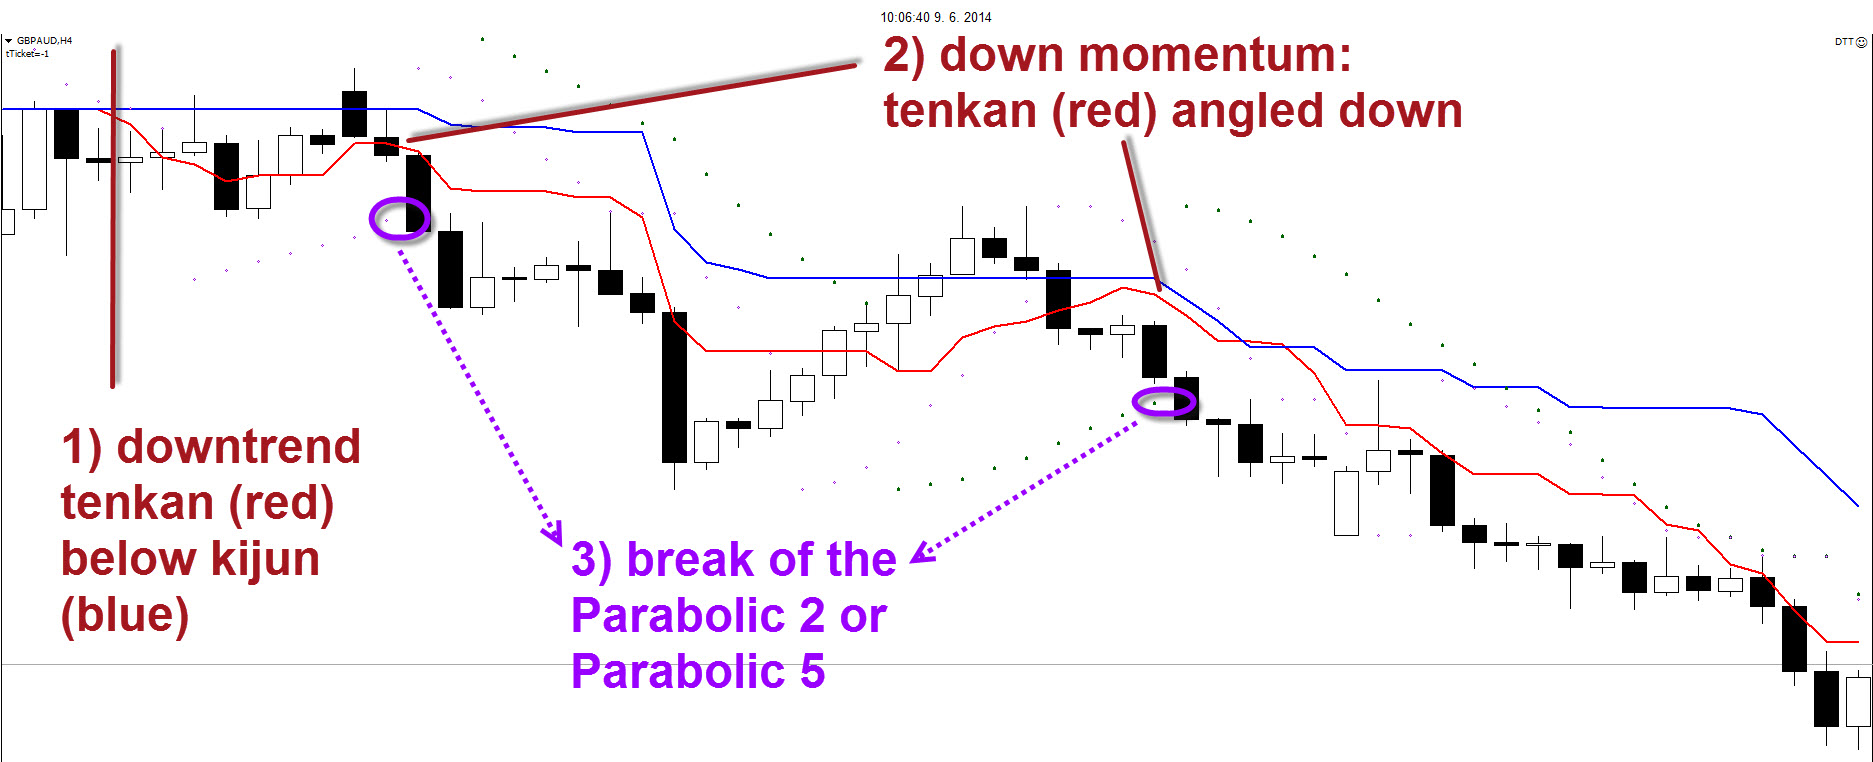
Green dots mean parabolic with a value 2, whereas purple dots mean parabolic with a value of 5.
The trigger means full alert for the trader as the moment of entry spirals closer…
Click to learn more about momentum trading.
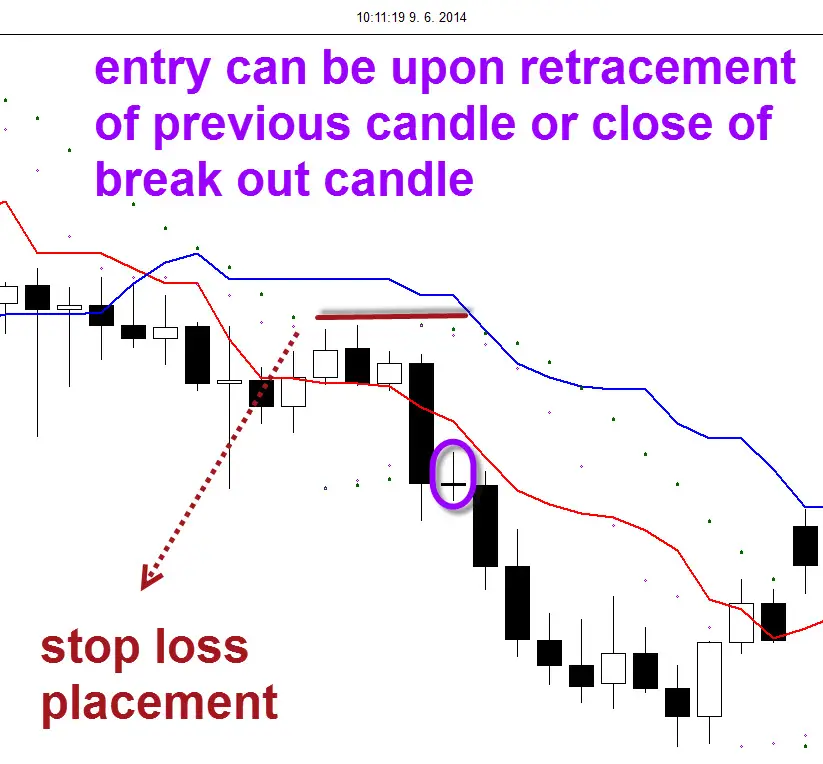
PART 5 ENTRY METHOD
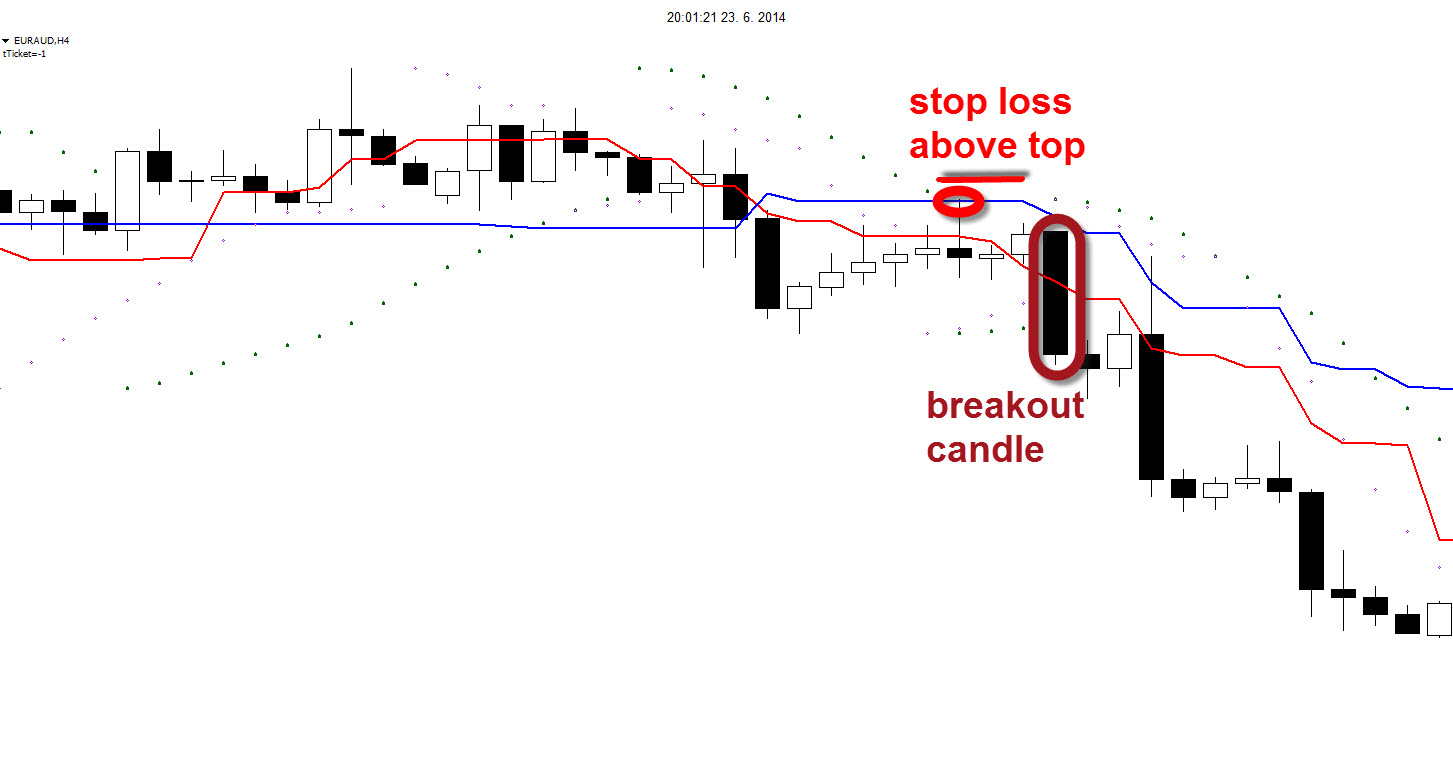
The entry method is an immediate market order as soon as the candle closes. There is one important element that needs to be confirmed before an entry is taken: the close of the candle needs to be near (within 40%) the candle extreme (in the direction of the breakout), which means:
a) An upside breakout should be accompanied with a close near the high;
b) A downside breakout should be accompanied with a close near the low.
False breakouts often tend to have big-sized wicks upon a breakout. By waiting for the candle to close, the trader can avoid these potential false breakouts and stay in control of their trading plan.
The entry is the defining moment but it never hurts to be critical before opening the position.
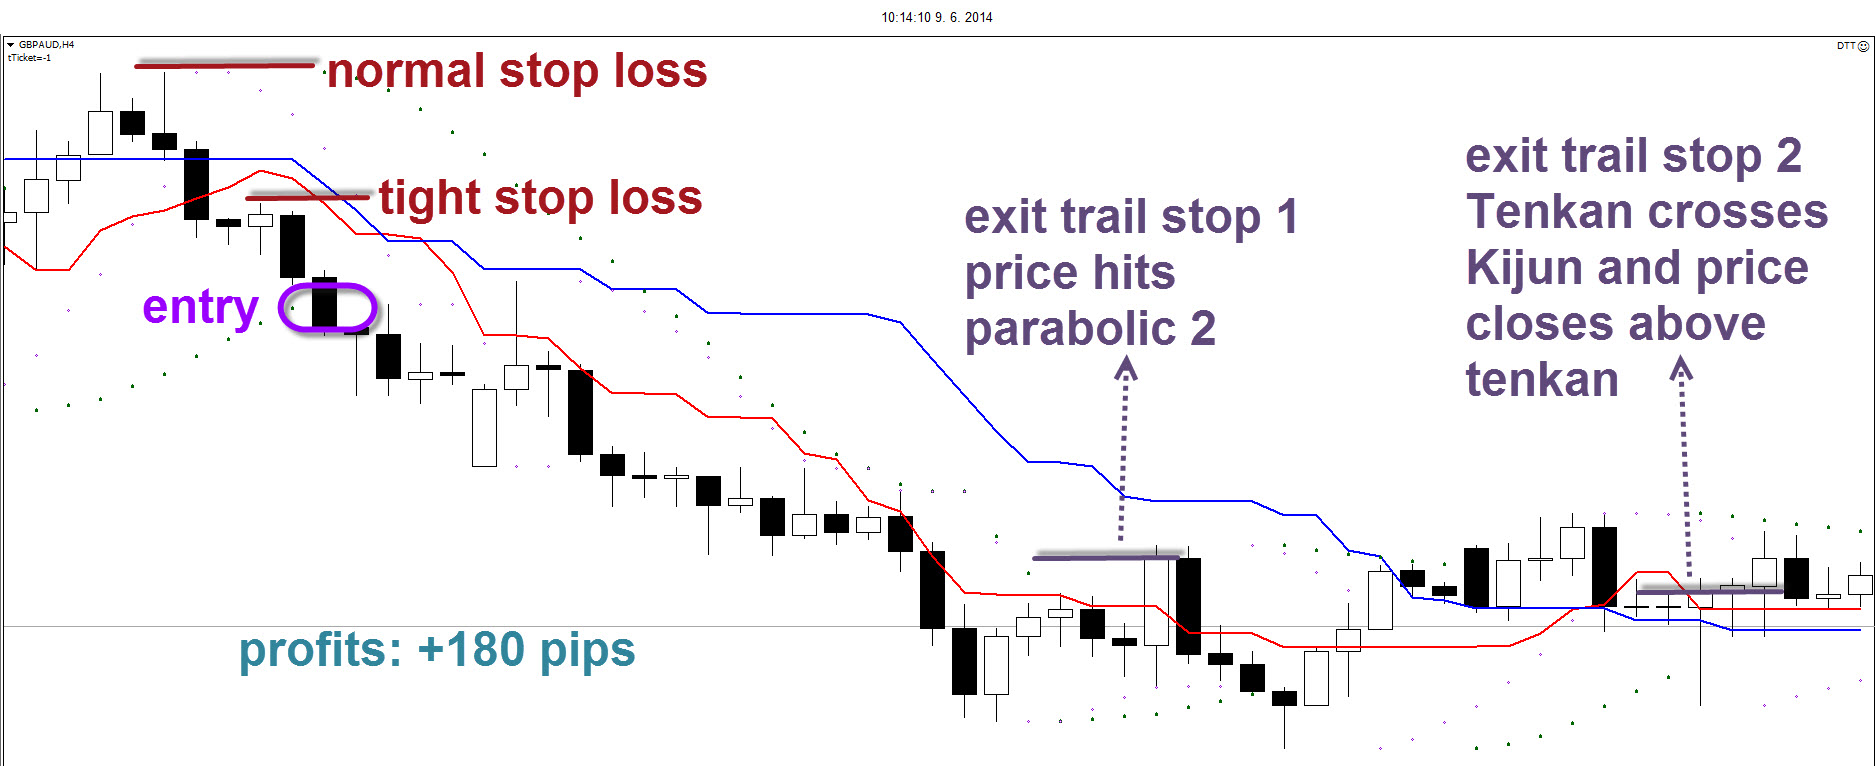
TRADE MANAGEMENT
The stop loss uses the tops and bottoms from the 4-hour chart. The tops and bottoms are candles which are the highest or lowest candles within a group of a minimum of 5 candles.
The take profit uses a trail stop loss. The main trail is an exit upon a crossover of the Tenkan and Kijun to the opposite side plus a candlestick close on the opposite side of the Tenkan line (for longs cross to the downside; for short cross to the upside). Another trail stop loss that could be used for discretionary purposes is the Parabolic value 2: as soon as the parabolic is placed on the opposite side of price then the trade is immediately closed. We also have training on Japanese Candlesticks and How to use them.
That concludes the rules and explanation of strategy 201. We hoped you enjoyed the ride!
But now… it’s YOUR turn!
We need your input on this strategy:
“What is the biggest edge of this strategy?”
“What is its weakest point?”
“What is its biggest improvement point”?
“Do you like the strategy?”
We hope you find that this simple yet profitable strategy can be a very profitable forex strategy. Let us know down below! Last but not least, make sure that the strategy rules match your own trading psychology to increase the chances that the rules are implemented effectively.
Thank you for taking the time to read our posts, and also for sharing this article with your acquaintances.
Please leave a comment below if you have any questions about this simple strategy!
Also, please give this strategy a 5 star if you enjoyed it!


 (23 votes, average: 3.61 out of 5)
We wish you Happy Trading!


Hi, Love the strategy. I love to be able to wait for the Tenken to tick up or tick down which ever way that you are trading. You could enter in when the candle goes through the kiyjin, but the ichimoku averages also act as dynamic support and resistance. I might add a Williams fractal and as the fractal is formed below the kiyjin and Tenken, (if trend is going down) to wait for the first fractal to form and wait for the price to trade through the fractal. Excellent strategy overall!! I will probably start using it myself. Thanks for the opportunity to contribute!
Parabolic settings on Mt4 is 0.02/0.2 default. The 2 and 5 settings for this strategy, how do I achieve this on Mt4? Though, I have the settings as 0.02/0.2 and 0.05/0.2 on my chart, Is that the required settings?
Can you explain about entry method of this strategy
HI Chris,
I really like this stategy, its simple and does a good job catching the big moves.
I’m looking at trading a dozen pairs, using the daily charts, so I only have to look once a day.
Have you tried this using daily charts?
Thanks
How do you make a trading journal?
Where can I find the actual parabolic settings and ichimoku indicator settings?
Hi John, thanks for the questions.
The Parabolic settings are 2 and 5. The values can be changed in the parabolic properties in the field “step”. The Tenkan and Kijun of the Ichimoku are standard settings. I then remove the other parts of the Ichimoku indicators.
Let me know if you have follow-up questions. Wish you good trading!
I have another question. If using the Tenkan trail stop gives you roughly 3 times the average gain of using the parabolic trail stop, why would you even consider using the parabolic?
The Parabolic can smoothen the equity curve. The Tenkan trail had a better performance because it was able to capture the big runs. But when the trade did not go for a big run, then the Parabolic was able to exit at a break even, small loss or small win; whereas the Tenkan exit result was often worse. So the Parabolic smoothens out the bad times, but does well in good times, which means it can limit drawdown compared to only using the Tenkan trail.
Well, immediate reaction is that it seems complicated. But I like the fact that it’s a 4 hour strategy, meaning (to me) that I only need to check the charts a few times a day. Perhaps once I set it up and try it out it will not seem as complicated.
Has it been tried on other pairs besides the EURAUD cited in the article?
Hi Dave, thanks for the feedback! Yes I agree with you that once you have it setup, then it should look less complicated. I think that many strategies look complicated at first glance because there could be new rules or tools incorporated into it and that always takes some time to get familiar with.
At the root of the strategy is the tenkan and kijun. These 2 things can be quickly checked:
1) Does the tenkan have an angle?
2) Does the tenkan angle match the trend?
If both questions have yes an answer, then we can keep an eye on that pair.
No only the EURAUD has been tested. I do think that the strategy could work well on others like EURJPY, GBPJPY, USDJPY, GBPAUD, other Yen and Aud pairs, EURUSD, GBPUSD, but maybe not so good on USDCAD, CAD pairs, USDCHF. That is my expectation. Trending pairs are better than slow moving ones like EURGBP.