kerala lottery results today Akshaya AK 402 Lottery Result of Kerala state lotteries weekly draw held on 3-7-2019(3th July 2019, Wednesday) will be declared at 4 pm. The Kerala Lottery live Result 3.7.2019 – Akshaya lottery 402 results with all details with Lottery winner numbers, Akshaya lottery first prize winner, second prize, third prize fourth prize fifth prize are listed on this website . Those who taken the Kerala Govt Lottery, 3th July 2019 Akshaya AK 402 Lottery can check their Official Akshaya lottery result today
Akshaya Lottery ak 402 results today
Official Kerala Lottery Results
Akshaya Lottery AK 402
*** keralalotteryresult.org.in ***
Akshaya LOTTERY NO. AK-402nd DRAW held on 03/07/2019 AT GORKYBHAVAN NEAR BAKERY JUNCTION, THIRUVANANTHAPURAM
Akshaya Lottery AK 402 Results on 3-7-2019. Find out Kerala lottery results of Akshaya series draw number ak 402 draw results, results are published by Kerala Lottery department of Kerala Government through their official Medium, dated 3-7-2019 time 3.30 pm, ak 402 Lottery results today. Result of Today’s Lottery on 3th July 2019(Budhan) will be publishing on or after 3 pm. Refresh this Akshaya ak 402 Results page 3-7-2019 page to view updated results of Akshaya Lottery.
The Lottery ticket price of Akshaya Lottery ak 402 is now only 30 Rs and you can buy tickets from any lottery selling people and keralalotteryresult.org.in publish result 100% accurately and timely. You can view or download result at 4 pm, and check weather the number got prize or not.
The Winning Tickets of “Akshaya Lottery AK 402 Results 3.7.2019 Today” should be subitted for the prize claim within 30 days from the date of Draw, you can verify the tickets with Kerala Lottery Results Today, and Kerala Government Gazette.
Pivot Points are a type of support and resistance levels that are used by many intraday and short term traders. When trading pivot points, many of the same rules are in force as with other types of support and resistance trading techniques.
Many traders keep a watchful eye on daily pivot points, as they are considered to be key levels at the intraday timeframe. We will go through the basic aspects of Forex Pivot Points and we will discuss a couple trading strategies that can be used with daily pivot points
What are Forex Pivot Points?
Forex pivot points are calculated horizontal price levels on the chart. These levels show potential areas where the price can reverse, especially during the first touch of these levels. Many Forex traders make their intraday trading decisions based on daily pivot levels, and as such it is important for intraday traders to watch price action at these levels closely.
How to Calculate Pivot Points
The Standard Pivot point calculation is quite simple. It requires only three numbers – close, high, and low.
We should first calculate the main daily pivot point. The formula for this:
Pivot Point (PP) = (Daily High + Daily Low + Close) / 3
Since the Forex market is a 24/5 market, there is some confusion as to which time to use for the daily market opening and closing. Most forex traders use the 11:59 PM (23:59) GMT for Forex market closing time and 12:00 AM (00:00) GMT for Forex market opening time. By doing this you can separate the daily trading sessions from each other.
When you get the PP, you can start calculating the further upper and lower pivot points. These are called first, second, third pivot resistance levels, and first, second, third, pivot support levels.
Calculating the First Pivot Resistance and Support
Since you now have the basic pivot point, you can now calculate the first support and resistance.
R1 = (2 x Pivot Point) – Daily Low
S1 = (2 x Pivot Point) – Daily High
Calculating the Second Pivot Support and Resistance
R2 = Pivot Point + (Daily High – Daily Low)
S2 = Pivot Point – (Daily High – Daily Low)
Calculating the Third Pivot Point Support and Resistance
R3 = Daily High + 2 x (Pivot Point – Daily Low)
S3 = Daily Low – 2 x (Daily High – Pivot Point)
We have gone thru the calculations above so that you can understand how these levels are calculated. We will now discuss some quick ways to calculate pivot points without having to do the manual calculations daily.
Adding Pivot Points to Your Chart
When you apply the basic pivot point and the three support and resistances, there will be 7 different levels. As you have seen above, it can be a bit tedious to perform the calculations manually. There are different options to get the pivot points without doing the calculations above manually.
Pivot Points Calculator
There are many online pivot point calculators on the net. When you open a pivot point calculator, you will be required to add the three price action variables. These are the daily high, the daily low and the close. When you add these three, you will simply click on a “calculate” button and you will instantly get your pivot points. Once you have that, then you could just plot the pivot lines on your trading chart within your trading platform.
Pivot Point Indicator
Most of the trading software available today will have a pivot indictor that will calucatate these levels for you automatically and plot them on your chart. First, check the list of indicators your trading platform offers. If you don’t have a pivot indicator there, you should do some research.
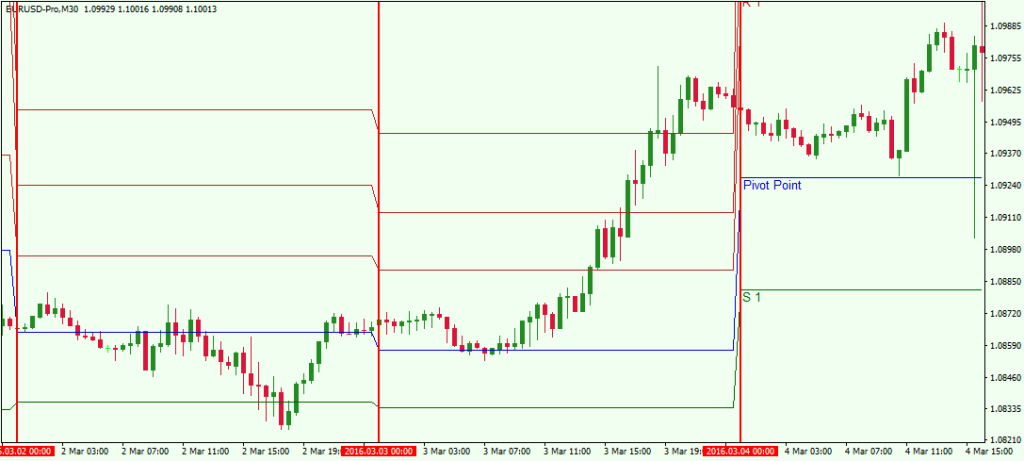
You can find many Pivot Point Indicators online, which you could simply add to your platform. Browse the net and you will definitely find a pivot point indicator available usually for free somewhere. You may have to import the indicator and then extract the files in the indicators folder of your trading platform. Once you have done this, you will be able to apply the pivot point indicator directly on your chart. When you plot your pivot point indicator on your chart, you should see something like this:
This is the 30 minute chart of the EUR/USD March 2, 3, and 4, 2016. The horizontal lines on the chart are the pivot points. The blue line is the central pivot point. The lines above the main pivot point are R1, R2, and R3. The lines below the blue line are S1, S2 and S3, (S2 and S3 are not visible). We also put three vertical lines on the chart. These three lines separate the different trading days. Notice that the pivot levels of every trading day are lined differently. This is so, because each trading day has different daily high, low and close values. In this manner, the pivot levels are different too. This is why there is a rapid switch in the levels of the pivot lines for every trading day.Learn What Works and What Doesn’t In the Forex Markets…
Trading Pivot Points
There are few basic rules when trading pivot points.
Be bearish when the price is below the main pivot point.
Be bullish when the price is above the main pivot point.
Go long if the price bounces from S1, S2, or S3.
Go short if the price bounces from R1, R2, or R3.
Since we have discussed the structure of the pivot points and the way they are calculated, it is now time to demonstrate pivot trading using some chart examples. Have a look at the image below:
This is the hourly chart of the USD/JPY for Feb 29 – Mar 4, 2016. The chart shows the pivot points’ price action for 5 consecutive days.
The circles show moments when the price consolidates and hesitates in the area of a pivot point. The arrows show moments when the price finds support or resistance around a pivot point level.
In this example we see price hesitate around a level 4 times and in 8 instances we have a price reversal after interaction with a pivot point.
Pivot Trading Strategy
Now that we have seen pivot points in action, we will now turn to applying some pivot point trading strategies.
Firstly, I will show you how to use pivot points as a part of a pure price action trading strategy, without the assistance of any additional trading indicator. We will rely on regular breakout rules to enter the market. If we enter the market on a breakout, we will put a stop loss below the previous pivot point. We will target the second pivot point level after the breakout.
Take a look at this chart:
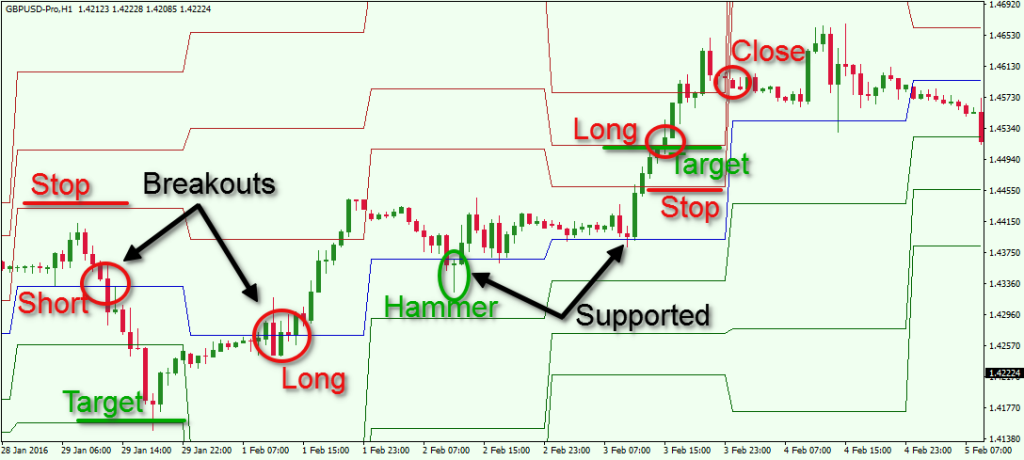
This is the H1 chart of the GBP/USD for Jan 28 – Feb 5, 2016. There are two breakouts through the PP level, which could be traded.
The first breakout through the blue pivot line comes in the beginning of the chart. One could short the GBP/USD. A stop loss order should be put right above R1 – the first pivot level above the main pivot point. The target should be S2 – the second level below the main pivot point.
It is very important to emphasize, that if your trade is held overnight, then the pivot points will likely change for the next day. In this manner, your stop loss and target may need to be adjusted to reflect the new levels.
As per the trade example above, about six hours after the short trade in the GBP/USD Forex pair, the price reaches the target, which was about a 138 pips profit potential.
The price starts increasing after reaching the target. In the middle of the next trading day, the GBP/USD breaks the main pivot point in bullish direction. This is a good long position opportunity. If you want to take this long opportunity, you should place your stop loss order right below S1, which is not visible on the picture in this particular moment. At the same time, your target should be on R2.
After breaking the main pivot point the price starts increasing and it breaks through R1. On the next day, the pivot levels are different. The price decreases to the central pivot point and it even closes a candle below.
However, the candle is a bullish hammer, which is a rejection candle formation. This hints that the trade should stay open. Furthermore, the stop loss below S1 is still untouched. The price then starts a consolidation which lasts until the end of the trading day.
When the next trading day comes, the pivot points are readjusted again and they are tighter. The main pivot point is higher. The price tests the main pivot point as a support again and bounces upwards. Then the GBP/USD enters an uptrend and the target at R2 is reached.
Notice that after reaching the target, the GBP/USD closes a candle above R2. This implies that the uptrend might continue, which puts on the table a third trading opportunity. If you go long here, you should place a stop right below R1. Since the trade is long and it is open on a breakout through R2, the target limit order should be placed somewhere above R3 (we have no R4 level). You could also use your own price action rules to determine how long you should stay in the trade.
Trading Pivot Points with MACD
In this pivot trading strategy I will include the Moving Average Convergence Divergence (MACD) indicator. The point of this strategy is to match a pivot point breakout or bounce with a MACD crossover or divergence. When you match signals from both indicators, you should enter the market in the respective direction. A stop loss should be used in this trading strategy the same way as with the previous strategy. Your stop should be located on the previous pivot level. You should stay in the trade until the MACD provides an opposite crossover. The image below will make the picture clearer for you.
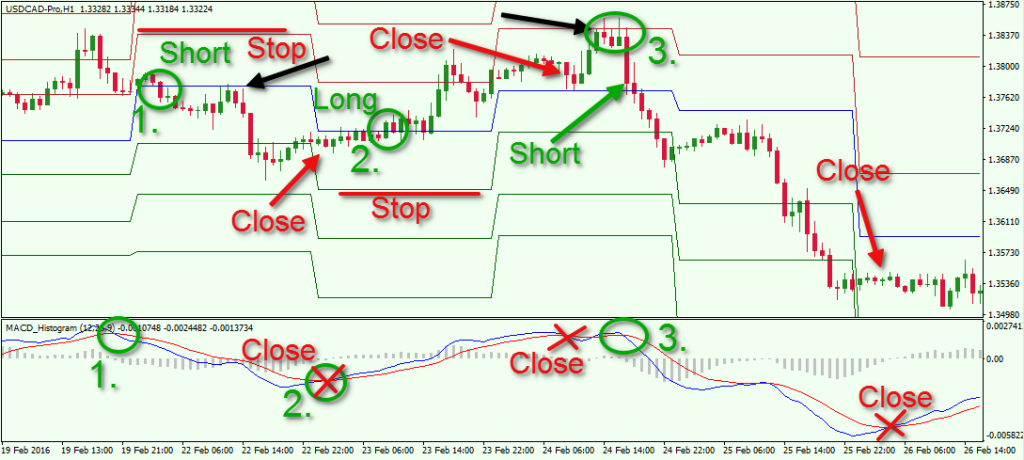
This is the H1 chart of the USD/CAD for Feb 19 – 26, 2016. The image shows one long and two short position opportunities. Signals are based on pivot point breakouts and MACD crosses.
We start with the first trading opportunity which is short. MACD lines cross downward and we get the first signal for an eventual downtrend. Few hours later we see the price breaking through the main pivot point, which is the second bearish signal in this case. One can now short the USD/CAD based on this trading strategy. A stop loss should be put right above the R1 pivot point as shown on the image.
The price starts a downward movement. However, we see a correction to the main pivot point (first black arrow). The price then bounces from the PP level and the decrease continues. The second hesitation in the bearish trend leads to a bullish cross of the MACD lines and the trade should be closed. One could have made 53 pips from this trade.
Notice that few hours after the bullish MACD cross, the price switches above the main pivot point. There are two matching signals coming from the PP and the MACD. This looks like a good long opportunity which could be traded. In this case the stop loss should be located right below the S1 pivot point. The price starts increasing and the MACD starts trending in a bullish direction. In the middle of the next trading day the MACD lines interact in the bearish direction. This should be taken as a closing signal. The long trade would have generated profit of 57 pips.
The price increases to R1 and starts approaching this resistance level. Suddenly, the USD/CAD bounces in a bearish direction. At the same time, the MACD lines cross in bearish direction as well. This is another match of two signals from the pivot points and the MACD, which is a short position opportunity.
The price immediately switches below the PP level and keeps decreasing rapidly. A correction occurs afterwards and the MACD lines almost cross in bullish direction. However, there is no bullish reading coming from the MACD and the trade should be held. The prices continues to move downward. The next hesitation in the bearish trend leads to a bullish cross in the MACD, which should be taken as an exit signal. This trade would have generated profit of 235 pips in about two days.
Conclusion
Pivot points are important intraday chart levels, which act as support and resistance areas.
Pivot points are considered very objective, since they are calculated using a precise formula.
The basic pivot point configuration include a basic pivot level (PP) with three resistance levels above (R1, R2, and R3), and three support levels below (S1, S2, and S3).
Pivot points are calculated using the daily high, low and close of the Forex pair.
In order to set daily time frames, many traders set the open-close of the Forex trading day to:
Start: 00:00 AM GMT
End: 11:59 PM GMT
Every trading day the PP, R1, R2, R3, S1, S2, and S3 levels change their location, because the daily high, low and close are different every day.
There are many pivot point calculators, which would facilitate significantly the way you extract your pivot data.
There are ready to use pivot indicators, which adapt to your trading platform.
You should always use a stop loss order when you trade pivot points. A good place to put your stop at is the previous pivot level from the one you use to enter the market.
You should take profit after the price goes through two pivot areas, or based on other price action clues or a confirming indicator signal.
The 123 Forex trading strategy is based on price action and normal Forex market structure that any trader should know. The 1 2 3 trading strategy is used as a continuation trading setup that is designed to take advantage of the trend of the market.
The failure of the 123 trading strategy is also a trade setup but can also warn you of potential price consolidation in the market or even a trend reversal in whatever Forex pair you are watching.
Keep in mind that even though it is a continuation pattern upon confirmation, it is also a reversal pattern from the short term trend direction.
1 2 3 Trading Pattern Formation
In any trending market, there is a pattern of higher highs and higher lows. In order for the trend to the upside to remain active, each successive impulse swing must take out the point 2 in the formation. When price surpasses the price at #2, the trader can use that as confirmation that the 1 2 3 chart pattern is present.
This is a line chart that explains the concept of the 1 2 3 trading pattern and in this case, we are assuming an up trending market
1 2 3 Trading Strategy
Let’s walk through each number and this pattern should be familiar to any trader who’s been looking at charts for a while.
When an uptrend pulls back, it will put in a low and from that low, price continues to rally.
This acts as short term potential resistance. Price rallies to this point and then begins to retrace back in the direction of the price at #1. We DO NOT want to see price retrace all the way to the price at #1. If it does, we will consider that to be the formation of a double bottom chart pattern and would trade that according to the trading plan you have set up for that price pattern.
This level is also considered a #1 only when the price level at #2 is broken. This price point is the level at which the corrective move completes and the price reversal to the upside begins.
Please note that the 1 2 3 price pattern is only confirmed once the high at point #2 is taken out by price.
You can also see that the 1 2 3 trading strategy is taking advantage of the stair step nature of the market that is needed if a trend is going to continue. It is at the confirmation of the patter that a trader can place a conservative trading position in the market
1 2 3 Chart Pattern By The Numbers
In an uptrend market situation, price will make 3 points
Point 1 is the lowest low point, forms a support level.
Point 2 will be the peak or the highest point, forms a level that we consider as potential resistance
Point 3 will be the 2nd low point, a support level ( which must be higher that the point 1 which is the lowest low point ).
The breakout of price above point 2 signals the continuation of the uptrend.
In a downtrend market, the 1 2 3 chart pattern forms when:
Point 1 becomes the highest peak when price finds resistance and moves down.
Point 2 becomes the lowest low point (forms support) and price moves up
Finds another resistance at point 3.
when price breaks the point 2 support level,it indicates that the market is most likely to continue downward
Trading Strategy Trading Plan
Let’s take a look at a potential trading method to trade the 1 2 3 trading strategy. We will look at a conservative method for those traders that need a little extra confirmation in their trades.
Keep in mind there is a cost involved. The longer you wait to get involved in a trading position, the larger you will have to make your stop loss.
123 Trading Plan
Trade Setup 1
You should be familiar with the numbers and what they represent on the chart. We can see that price rallied from point 3, found resistance at point 2 and retraced. We now have a double bottom chart pattern and just as the 1 2 3 trading strategy needs a breach of #2 to confirm the pattern, so does the double bottom.
If you do get a double bottom after a move in price, that could signify weakness in the market. If bulls were fully in chart during the retrace at 2, we should not see two shots at the level #3.
Price breaks above #2 and you can either enter at the breakout or, my preference, take a position at the close of the candlestick to confirm a true break. You can also put an order to buy slightly above the candlestick that broke the #2 level.
Your stop loss should be below #2 with buffer room to allow for noise. You can also, my preference is coming, use a 14 period Average True Range x 2.
Trade Setup 2
Price rallies from #1 and gives us a strong reversal candlestick at #2. Once price begins to retrace, put this currency pair on your radar. Price find support at #2 (inside the previous consolidation pattern from trade #1) and shows strength as it rallied to #2
Once price shatters the #2 price zone, enter at the close of the daily candlestick (or whatever time frame you are using) and use an ATR stop. The average true range stop for this trade would actually be in the middle of the candlestick that printed just before the breakout candlestick.
Trade Setup 3
Each trader should understand this pattern by now so let’s focus on the range that is occurring. We have most variables need for the 1 2 3 trading strategy but price is forming a range near the level at #3.
That is NOT something we want to see for a clean 1 2 3 chart pattern.
When price is basing in this fashion, it shows that the side that was dominant, in this case bulls, have tired. As a trader for years, I have seen the following occur:
Price trends nicely
Weakness shows up in this fashion
Traders will take another run to the upside, break #2 and then see this fail back inside
This formation of the consolidation is also a great trade entry into the potential of the 1 2 3 chart pattern continuing.
Front Running
We can position early in the 1 2 3 formation when we have basing occurring. Ideally, we would like to see some form of basing near the resistance level (red line). You can see the green dashed line and then price rockets to resistance.
That is not conducive to a sustained break of resistance.
The more favorable setup is to have either basing near the extreme or a slight pullback in price which we see with orange box. The break out then occurs after that pullback.
Those types of breaks are more effective and see if you can understand why. Some would think the first break would carry more weight because the drive started midway in the range.
But traders who positioned lower will also look for scalping Forex trades at the top of the range – is that not how you play a range?? Yes. The breakout that occurs is driven by traders who went long at the bottom of the range.
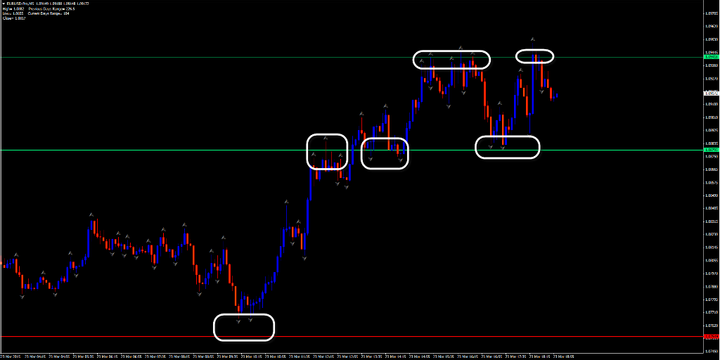
Let’s see some detail in this chart
Price could not rally far from the low which is showing the 1 2 3 chart pattern – the stair stepping in a trend – is under attack. Price can’t break lows so traders go into range trading mode
The formation of this smaller range allows traders to position with a tighter stop loss just under the small range.
You can see there was a drive to this level and then a very weak candlestick shows up. This is either traders positioning short in the range or the longs taking profits.
That is the type of thinking you want to have as a trader. Do not trade blind!
What Is Your Entry Strategy?
As discussed, you can enter at the close of the break out candlestick (signal candlestick) or entering your trading position at a break of the high.
Some traders may want to use a multiple time frame approach and enter on a lower time frame. In my own trading and in my years as a trader, I look to simplify. Entering at close or breaks of support levels or resistance levels (highs and lows of breakout candlesticks) is my favored entry
Taking Your Profits
Some traders would like to see specific price targets to add to their trading plan. Other traders see the power of trailing their stop loss to take as much as the market is willing to give.
You can use structure targets such as higher resistance levels in an uptrend.
You can use legs 1-2=3-4 which suits the 1 2 3 trading strategy.
One to One Targets
I color coded each swing so you can see where I am measuring from. I use the 3 point Fibonacci tool and set it to the 100%. You can see the first two trades nailed the targets. The third trade hits the .618 Fibonacci level which is quite popular when used to portion out swing points.
Summary
The 1 2 3 trading strategy is a pure price action trading method that uses a sound approach to trading.
No trading indicators are required although I do suggest the ATR for stop loss placement.
You must have a proper risk protocol as part of your trading plan.
One Forex strategy that you might like to try is based on a straightforward indicator known as theSimple Moving Average (SMA). The SMA Forex trading strategy aims to provide the highest possible return for the amount of risk assumed. The SMA measures a security’s value during a specific time frame, to give traders a better sense of when to buy and sell a currency pair.
For example, if you set up a 12-period SMA with 15-minute intervals, any increase in the currency pair’s value above the 12-period SMA could present a signal to buy. Likewise, should the currency pair’s price fall below the 12-period SMA, it could be a signal to sell. This popular Forex trading strategy may be good for beginners as it can be used with any time frame, and with most trading instruments.
Additionally, you can combine the SMA with helpful tools, like indicators. Traders may choose to use the SMA as the foundation of their strategy, and then build from there. No matter what you do, remember to test all Forex trading strategies on a Demo Account first, before going live. One way beginners can develop their own approach is to test more understandable SMA-based trading strategies, and then add other indicators when and if consistently desirable results are achieved.
Optimise Potential Profit with Positional Trading
You cannot predict which strategy will provide you with the most success, or indeed any at all. However, positional trading could be a potentially profitable Forex strategy. Positional trading involves holding positions over the long term – usually, between one month and a year. It has the advantage of being largely hands-off. However, it requires a long-term plan, and the ability to predict future market direction. To get started with positional trading, you must first pick an asset. When determining which currency pair to use, there are three factors you need to consider:
High Long-Term Volatility
Volatility is crucial for turning a profit. You need to pay for ‘SWAPs’ every night in order to hold a trade open, and you could easily suffer a loss on any given night, unless your currency pair experiences some notable price movements within a few months. One way to increase the odds of success is to select currency pairs that may feel influence from:
Upcoming political events
Economic events in the near future.
Low Short-Term Volatility
A currency pair with low short-term volatility is more likely to move slowly in the direction of your trade, instead of experiencing sharp fluctuations that might prompt you to close your position.
Use Low Margin
While Forex traders frequently trade with very highleverage, this approach is not suitable for positional trading. When it comes to positional trading, keep one thing in mind – the less leverage you use, the better it may be. To determine how much margin to use for your Forex strategy, consider the following variables:
The amount of money you have outside your trading account – remember to only trade with risk capital
How much leverage will provide the best risk-reward ratio
Benefits of Scalping
Source: EURUSD Chart – Data Range: May 2016 – An example of scalping – Please Note: Past performance does not indicate future results, nor is it a reliable indicator of future performance.
While positional trading may (or may not) produce great benefits, trading can appeal to many different types of people, for different reasons. Some traders enjoy spending time watching the markets, as doing so gets their heart beating and their adrenaline flowing. One Forex strategy that may provide this adrenaline rush is scalping. The idea behind the scalping strategy is to complete a large number of trades that individually generate small rewards – between five to ten pips each.
Traders usually keep these positions for one to five minutes, and spend all day monitoring buy/sell signals. Some professional traders have generated great returns with this approach, including Paul Rotter. Mr. Rotter attained legendary status with scalping and earned the nickname ‘The Flipper’ for his quick trading actions. Rotter would open buy/sell positions simultaneously on the derivatives exchange ‘Eurex’. When traders responded, he would quickly scalp profit from one alternative.
One crucial factor in Rotter’s success was to closely watch the order book. To cultivate your own unique and efficient Forex trading strategy, consider these key variables:
Your desired risk-reward ratio
Your tolerance for stress
How much time per day you want to spend trading
Most importantly, only use techniques you fully understand and never stop improving your strategy. A free Demo account is perfect for testing new things out risk-free, and for working on your overall performance.
The Another one of our free forex strategies trades a confluence between daily Pivots and Fibonacci retracement levels.
The Daily Fibonacci Pivot Strategy uses standard Fibonacci retracements in confluence with the daily pivot levels in order to get trade entries. My preferred parameters are the 38% or 50% Fibonacci levels in confluence with the daily central pivot. The examples following show entries at the 38%, 50% and 62% Fibonacci retracement levels in confluence with the daily central pivot.
As with all free forex strategies, there are many possible interpretations and variations. My particular take on this strategy is as follows:
look for an entry on any currency pair where the average true range for the last five day period has been exceeded in the previous day’s trading session
at the start of the current trading session draw fibs:
look for a confluence of Fibonacci retracement levels with the daily central pivot
If price retraces to the confluence identified, either enter at market or wait for a confirmatory candle signal to occur at the confluence before entry. Obviously, it is more risky to enter before getting the confirmatory signal, but such an approach gives a greater possible reward to risk ratio.
Let’s have a look at a few charts to see how this works.
The first chart shows a long entry at the confluence of the 38% Fibonacci retracement and the daily central pivot:
It was possible to enter either way here, either by buying at the first touch of that level, or waiting for the morning star candle formation to form. Both entries would have given a possible target at the 127% Fibonacci extension level, which was easily reached.
The suggested stop loss for these trades is behind the Fibonacci level one level away from where you take the trade. In this case it would amount to the 50% retracement level, with a few pips extra thrown in for buffering.
The next trade shows the reverse setup of the previous trade, with a sell occurring at the confluence of the 38% retracement and the daily central pivot:
This was a nice set up given the big drop that occurred in the previous trading session. That drop signified a change in sentiment which would have added weight to the decision to sell.
Another example, again, a sell after a long run down the day before:
This time the sell occurs at the 50% retracement level, although it is not in perfect confluence with the daily central pivot. Still, a nice evening star pattern occurred with both the daily central pivot and the 50% retracement level being respected prior to entry,
The last example shows a confluence of the central pivot with the 62% retracement level, plus old lows at the left of the chart:
This is an example of the fact that any pivot level can be used in confluence with the daily central pivot. In this case price retraced to once more retest the entry-level on the next day, but you should have had profit taken out of the trade by then, if not having exited at full profit.
As always with any new strategy, and in particular free forex strategies, remember to fully back test and live test in a demo account before going live with this particular play, if you decide it is a good fit for you.
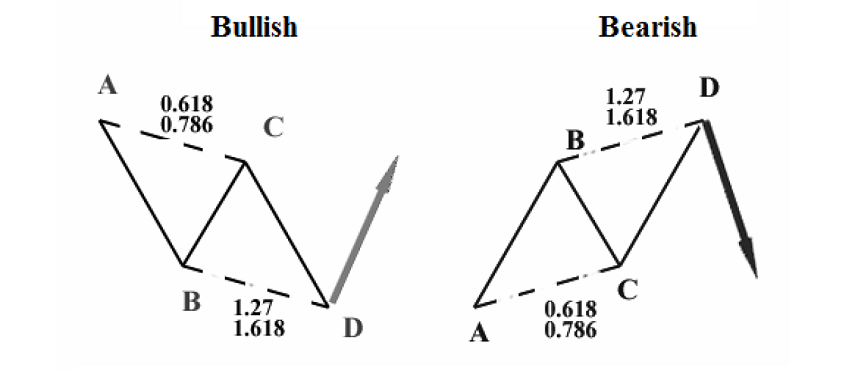
The ABCD is a basic harmonic pattern. All other patterns derive from it. The pattern consists of 3 price swings. The lines AB and CD are called “legs”, while the line BC is referred to as a correction or a retracement. AB and CD tend to have approximately the same size.
A bullish ABCD pattern follows a downtrend and means that a reversal to the upside is likely. A bearish ABCD pattern is formed after an uptrend and signals a potential bearish reversal at a certain level. The rules for trading bullish and bearish ABCD patterns are the same, you will just need to take into account the direction of the pattern you trade and the movement of the market it predicts.
There are several types of ABCD pattern (all the 3 patterns at the picture are bullish).
In the classic one, the point C should be at 61.8%-78.6% of AB (Use Fibonacci retracement tool on AB: the point C should be close to 61.8%). The point D, in its turn, should be at the 127.2%-161.8% Fibonacci expansion of BC.
Notice that a 61.8% retracement at the point C tends to result in the 161.8% projection of BC, while a 78.6% retracement at the C point will lead to the 127% projection.
There is also the so-called AB=CD pattern. Here CD has exactly the same length as AB. In addition, it takes the market the equal time to travel from A to B as from C to D. As a Result, AB and CD have the same angle. This type of ABCD pattern is seen quite often and is popular among traders.
The third type is when CD is the 127.2%-161.8% extension of AB. CD can be even 2 times (or more) bigger than AB. There actually are some signs that can hint that CD will be much longer than AB. They are a gap after point C or big candlesticks near point C.
The key thing you should remember is that you can enter the trade only after the price reached the point D.
Study the chart looking at the price’s highs and lows. It may be helpful to use ZigZag indicator (Insert – Indicators – Custom – ZigZag) that marks the chart’s swings.
Watch the price as it forms AB and BC. In a bullish ABCD, C must be lower than A and should be the intermediate high after the low at B. Point D must be a new low below B.
When the market arrives at a point, where D may be situated, don’t rush into a trade. Use some techniques to make sure that the price reversed up (or down if it’s a bearish ABCD). The best scenario is a reversal candlestick pattern. A buy order may be set at or above the high of the candle at point D.
Take profit levels
Here are the target levels for trading the ABCD pattern.
TP1: 38.2% retracement of AD
TP2: 61.8% retracement of AD
TP3: point A
We recommend using these levels together with support and resistance you identify at the chart using various tools of technical analysis. Don’t forget to have a look at senior timeframes when you hunt for support and resistance levels.
If the price moved to TP1 fast, the odds are that it will continue towards TP2. On the contrary, if the price is slow to get to TP1, this might mean that it will be the only TP level you’ll get.
There are many cases when the market reversed after AC=CD pattern going beyond point A.
As for Stop Loss, there are no special recommendations. You can put a Stop Loss in line with your risk management rules.
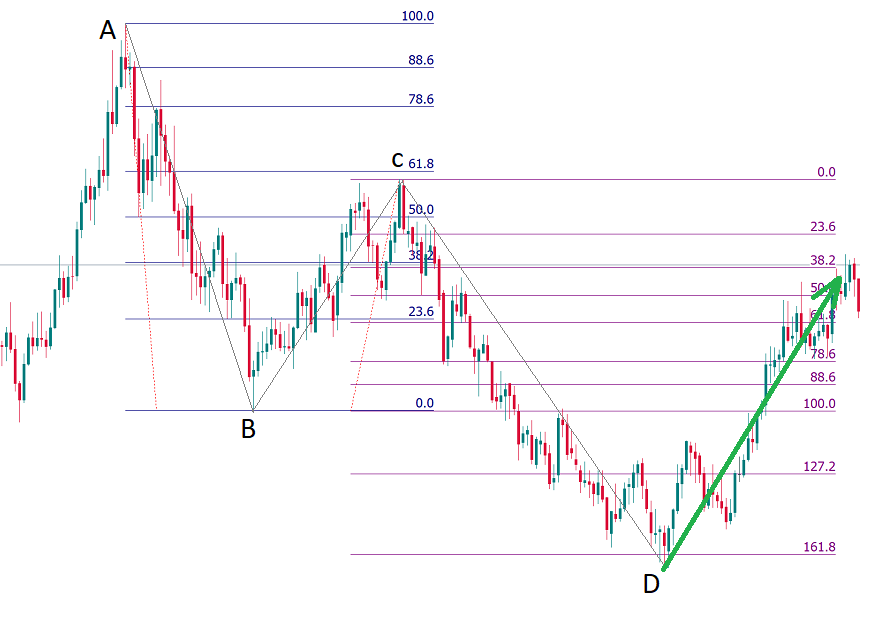
Here’s an example of the ABCD patterns on the chart:
Conclusion
You can find many ABCD pattern on one chart. The rules for trading each of them are as explained above. Make sure that you know how to apply Fibonacci tools correctly an follow all our tips.